WordPress has made it infinitely easier to set up a website presence online; however, there’s still a lot to learn for a new blog owner. So, if you’re new to blogging, then it’s likely that you may need a little help getting started and knowing how to set up your new WordPress blog the right way will go a long way towards your future success.
In this post, we will take you through the steps to set up your WordPress blog the right way, the first time.
While WordPress offers an almost unrivaled level of functionality and ease of use, the sheer number of options can actually be paralyzing. This leaves many would be bloggers stuck in the planning stage while ignoring the actual getting started phase.

While it’s easy to get a bit lost thinking about the vast number of options at your disposal, there’s no reason to drown in the details. In this article, we’ll be giving you a comprehensive (yet manageable) checklist for setting up your brand new WordPress blog.
Before you complete the steps below, it would be wise to install SSL if you haven’t already. If you do not have SSL, your site will not be viewable in most browsers, so this is a critical part of setting up a new website or blog.
Step 1: Fine Tune Your Settings
While WordPress is functional out of the box, there are some key settings that you should tinker with to get things ready. Changing these settings can help your blog to be more functional and to get better search engine rankings.
Change your site title and tagline

Head over to Settings > General and make sure your blog’s title and tagline are what they should be.
Your Site title should match your domain name, and your tagline should be a short, one-sentence description of what your site is about.
You don’t want to overthink your site tagline, but at the same time, you want it to contain some of the keywords you want your site to eventually rank for. This makes it easier for search engines to find you if your WordPress theme ends up outputting your tagline on the front-end of the site.
URLs
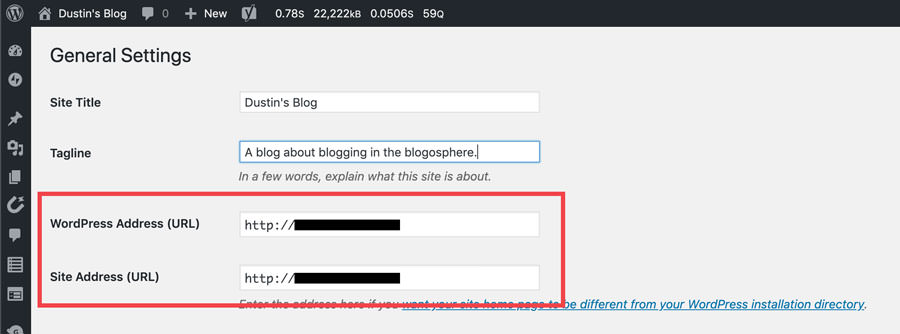
Also in Settings > General, make sure that your domain is set to match the actual URL of the site. It sounds obvious, but sometimes there could be the slightest difference (such as http:// vs https) and that will cause issues.
Note: In all cases, we recommend that your domain is https:// but only after you have installed an SSL certificate and fixed any mixed content issues.
Set your timezone

While you’re still on the Settings > General page, you’ll want to scroll down and make sure your Timezone is set to your timezone.
Why does this matter? Because if you ever go to schedule blog posts for a specific date/time, you want to make sure it’s being published on the date/time according to your timezone. By default, it is set to UTC +0.
Allow search engines

On the Settings > Reading page make sure the checkbox next to “Search Engine visibility” is unchecked as it is probably unlikely that you want to discourage the search engines from indexing your new WordPress blog.
This is important to double-check because it’s very easy for a developer or designer to create the site in a “development” or “staging” environment and forget to switch this setting over when it goes live.
Change your permalinks structure

In the past, the default permalink structure that WordPress was set to was ‘domain.com/year/month/post-title/’. These days the default (as it should be) is ‘domain.com/post-title/’.
If you are setting up your blog for the first time, on the Settings > Permalinks page, make sure that your settings reflect the latter, or as WordPress labels it, Post Name format. This is the most optimal format for SEO and keeps your articles from looking “dated” once they’ve aged a year or two.
You don’t want anyone landing on an old blog post, seeing the date in the permalink and thinking it’s irrelevant just based on that alone.
If your blog is already live, we recommend that you consult with a web developer before changing permalinks as you could end up breaking your site.
Step 2: Choose a Great Theme
The unfortunate truth is that appearances do matter. Even if you’re an expert in your field, it’ll be tough for people to take you seriously if your new WordPress blog design makes it look like a 5th grader is running your website.

Fortunately, there are thousands of beautiful themes available for WordPress. To find a great theme, you can start by searching the built-in theme database in WordPress itself or visiting one of the many premium template sites.
Premium themes come with the benefit of added support, and this could be worth the cost if you need some extra help, because you’re generally on your own when it comes to free themes.
Our company has chosen to go with Studio Press, one of the most trusted names in WordPress themes. Their flagship theme, Genesis is the basis for every version of our site since inception. Not just because Genesis is a rock-solid, SEO-optimized, lightning fast foundation, but because they have world-class support and a long history of contributing to the advancement of the WordPress community at large.
Step 3: Install Google Analytics
Google Analytics is a powerful way to learn about your website’s visitors and can help you make decisions about optimizing your website to improve performance.
While there is only a snippet of code to install in order to get started, there are multiple ways to install it, and it can seem confusing to new users. This video offers three ways to install Google Analytics on WordPress.
Of course, installing Google Analytics on your site is just the minimum requirement. We put together a comprehensive guide to setting up GA to track your social media ROI for you to follow when you are ready to take it to the next level.
Step 4: Install Essential Plugins
Plugins are a big part of your WordPress blog, and installing great plugins can turn an okay blog into a fantastic blog. They can add new functionality, they can speed things up, and they can even make your job a lot easier.
We’ve already compiled a list of the best WordPress plugins that you might want to try, so we won’t list them all again. Instead, we will focus on a few of the most essential plugins. Some of these require a bit of setup/configuration which we’ll walk through below.
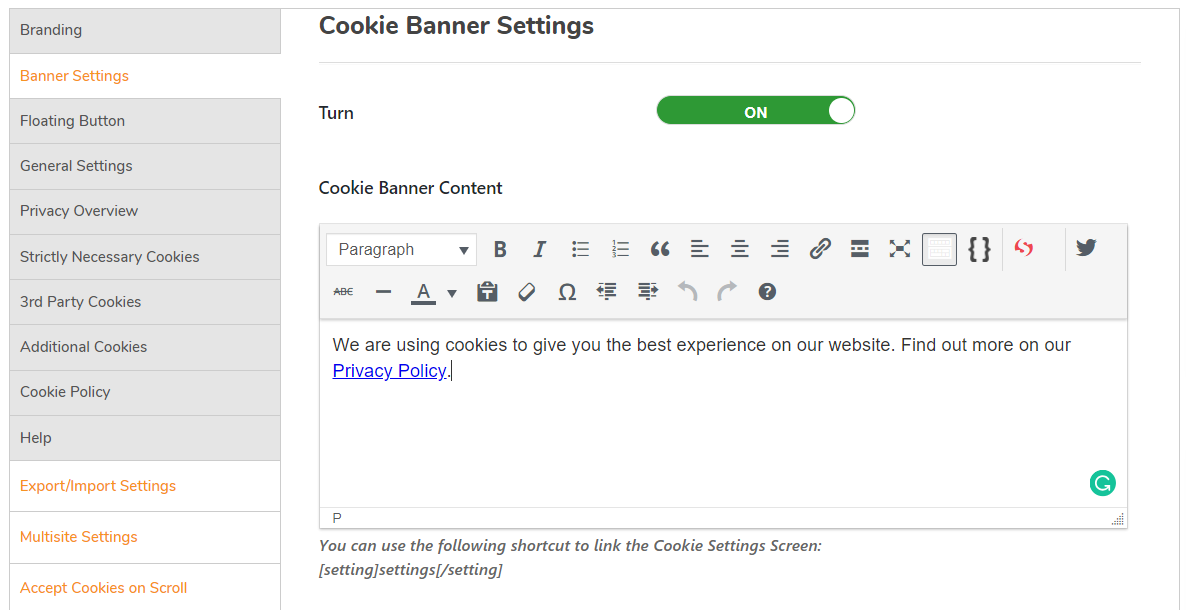
GDPR Cookie Compliance
The GDPR Cookie Compliance plugin has settings that can assist you with GDPR cookie consent compliance requirements, including giving your users full control over cookies stored on their computer and the ability for them to revoke their consent.
Pro Tip: Be sure to set up a privacy page on your new WordPress blog and link to it under the Cookie Banner Settings.
Note: This plugin does not necessarily make your website compliant and that you are responsible for ensuring that you are meeting all GDPR requirements.
WP Rocket
Note: You might want to install this plugin LAST, right before you launch as sometimes caching plugins cause problems for new website owners who don’t quite understand how they work.
WP Rocket is a premium WordPress caching plugin that is extremely effective at improving (speeding up) the load time of your website.
There isn’t one recommended configuration of WP Rocket that can be used on every site since themes, plugins, and hosting environments can vary greatly. However, with WP Rocket you should see the loading time of your website decrease significantly right out of the box.
To improve your site speed even more with WP Rocket, here are a few of the basic options you can enable:
Mobile Cache

If you are using a regular or responsive theme without any mobile plugins, go ahead and enable mobile cache.
Lazyload

If you have long pages, you can make the load faster by enabling LazyLoad for images and video embeds. This delays the loading the images outside the viewport until the user scrolls to them.
Logged-in User Cache
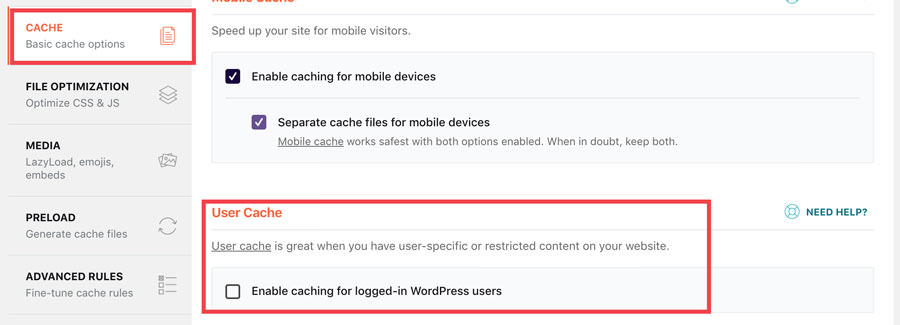
If you have users who have to login to access your site, enable caching for logged in users so that each user will get his or her own cache.
Cache Lifespan

We recommend leaving the caching lifespan set at 24 hours. If you set this too low, it will clear the cache too frequently; if you set it too high, it might cause visitors to miss the latest content on your site.
Files Optimization
For new WordPress blog users, it is highly recommended that you leave minification and concatenation disabled as these settings may sometimes cause your site to break, depending on your code.
While these settings can have a significant effect on your load time, your specific combination of theme and plugin files may be affected by these settings. If you run into any trouble, however, the WP Rocket support team is top notch.
Heartbeat

This sounds like a really strange setting, but the Heartbeat settings actually refer to the WordPress API running behind the scenes of your website. Without getting too technical, this controls how frequently WordPress will communicate changes with your server.
Essentially, controlling this activity and reducing it will allow for less load on your server, and faster load times (especially on the back end). We recommend starting with the Reduce Activity setting for all, and maybe testing to see the how more aggressive Disable setting affects your site.
Yoast SEO
You can write the best blog post in the world but still have it fail without proper search engine optimization. While SEO is intimidating to many new bloggers, it doesn’t have to be, and a good SEO plugin can help you learn exactly how to optimize your blog posts to get ranked higher in search results.
Yoast is a great plugin that allows you to perform useful functions that can help your SEO. It does things such as creating XML sitemaps with one click and optimizing your meta descriptions for better click-through rates on search pages.
Many of the settings inside Yoast SEO are self-explanatory and don’t require much help figuring out. However, there are also settings in which it does help to have a bit more guidance.
Content Types

Head over to the SEO > Search Appearance > Content Types settings page where we’ll take a look at all the post/page types on your site, and how they appear to search engines.

Now, most people skip right past this part or don’t know enough about it to want to fiddle with it. Here’s the gist–we want to control how search engines display our posts and pages in search results.
For beginners, you probably only have two types to configure–Posts and Pages. For more advanced sites, you may have some custom post types (such as Portfolio or Testimonials) which will also be listed here.
You will have three primary settings to configure on each post type:
- Show [Post type] in search results? If you want these posts to show up in search results, set it to Yes.
- Date in snippet preview: this is asking you if you want search result pages to show the date your article was published. For most people, you probably don’t want the date to show so people don’t judge the content by its age.
- Yoast SEO Metabox: this is asking if you want to have the Yoast settings box inside the post editor. If you answered Yes to the first option above, you will want to select Yes for this option as well.
It is best to keep your SEO titles and Meta descriptions at the default setting, unless you have experience with this.
Taxonomies
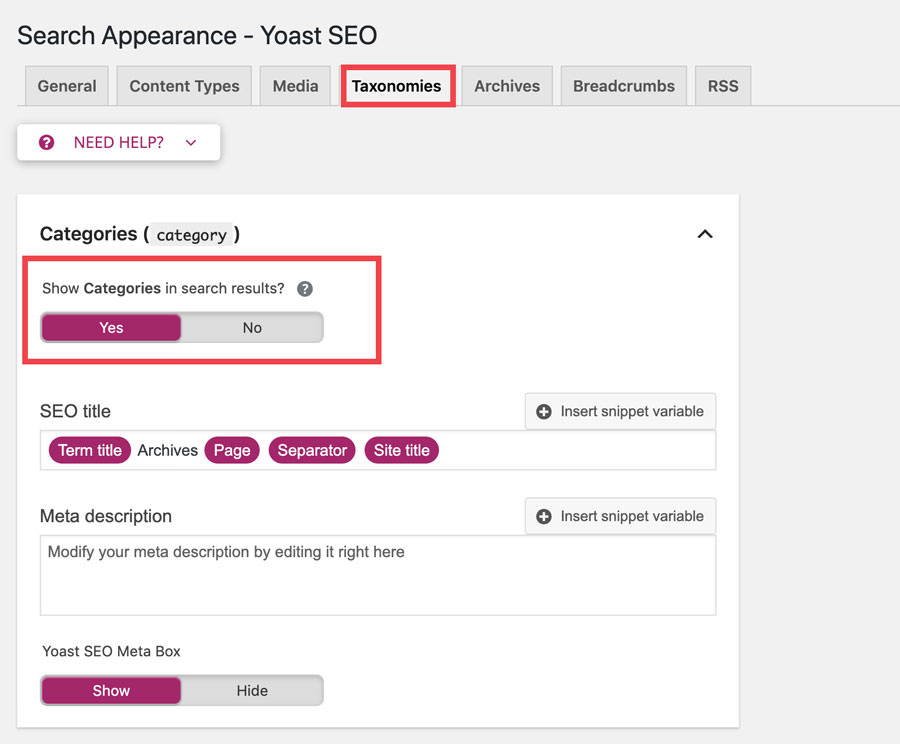
In the SEO > Search Appearance > Taxonomies tab you’ll want to configure your different Categories, Tags, etc. (also known as taxonomies) to display in your sitemap or not.
We recommend only enabling the taxonomies that you want to be ranked (such as categories or other custom taxonomies that aren’t going to create what’s known as Duplicate Content.
Duplicate content is content that is available in multiple locations, and it can be on or off your website. A lot of times, duplicate content happens accidentally as the result of sub-par technical implementation. That’s what this article is trying to help you avoid.
Bottom line, set those taxonomies which represent your keywords, and won’t create duplicate content (redundant with other taxonomies) to show in search results. For all other taxonomies, hide them.
Archives
This settings tab will show you any Archive pages that don’t fall under a specific taxonomie. These are things like your Author Archives and Date Archives. In both of these cases we recommend Deactivating them.
For one, if you’re a single-author blog, you have no need for an Author Archive anyways. Even if you do have multiple authors on your blog, this would still create potential for duplicate content, and not have any intrinsic benefits of allowing to be active.
As far as Date Archives, we’ve already established a few times how Dates can work against you if you’re creating evergreen content that shouldn’t be dismissed because of how long ago it was published.
You can find these settings in the SEO > Search Appearance > Archives tab.
RSS

If you had forgotten about RSS feeds, you are not alone. They seem to have fallen from popularity over the years; however, there are still some who use RSS feed readers to subscribe to blog content.
Unfortunately, many website content scrapers do as well. That is why we love the setting in Yoast’s SEO > Search Appearance > RSS tab that allows you to include language to let others know if your content has been scraped without your permission. Here is how we have ours set up:
On a similar note, Social Warfare helps protect content with Frame Buster.
We built our highly demanded Frame Buster right into Social Warfare so that you are protected from content hijackers seeking to place their advertisements on top of your content without your permission.
Updraft Backup Plugin
Blogging is a lot of work. Don’t take a chance on all of that hard work being taken away from you! A good backup plugin should be one of the first things that you install on your new blog.
There are so many disasters that can happen between catastrophic hosting failures and even somebody trying to outright steal or ruin your website! Keeping a good backup protects you from these problems, and you’ll be grateful for its existence if things get hairy.

Don’t fool yourself … it’s not a matter of if … it’s a matter of when.
Updraft allows you to automatically schedule important backups and even send those backups to a variety of cloud hosting providers like Google Drive or Dropbox for safekeeping.
One thing we love about the UpdraftPlus plugin is they have an incredibly helpful onboarding guidance that begins as soon as you activate the plugin.

Just follow their helpful setup messages and you’ll be setup in no time.
Wordfence
While backups are essential for protecting you from disaster, an ounce of prevention is worth a pound of cure. Having a good defense system in place to make sure that you never need to use that backup due to attacks on your new WordPress blog is equally important.

While you’d think only sites with large followings would be at risk, that’s not true at all. Even small sites are frequently targeted.
Wordfence puts a barrier up to keep out these intruders by protecting your login pages, blocking malicious traffic, and scanning for malware that could be lurking within your site’s files.
Wordfence also has great onboarding messages to help you get started, so just head to the new Wordfence tab in your WordPress admin sidebar and follow their messages.
Step 5: Make Your New WordPress Blog Shareable

Social media is a powerful tool. Even if you’re struggling to attract search engine traffic in the early days of your blog, it’s possible to utilize social media to get the traffic boost that you desperately need.
Unfortunately, many social sharing plugins leave much to be desired. A lot of them are clunky, and they slow down your site, damaging your search rankings!
The good news is that we have created a lightweight and useful social sharing plugin that gives you tons of options. This includes the ability to implement share buttons that look great on all devices and even follow your visitors down the page, increasing the chance of them sharing the post! Click here to get Social Warfare – Pro now!
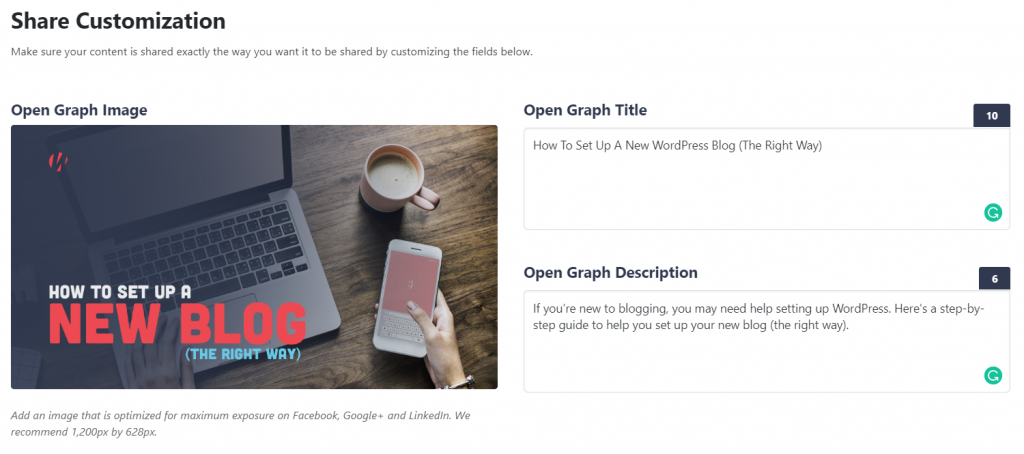
You can also choose exactly what images are shared when people decide to pin or tweet a post, allowing you always to put your best foot forward when meeting potential new readers for the first time.
Get Social Warfare – Pro
Wrapping this up
Hopefully, this guide has helped you with setting up your new WordPress blog but try to remember that this is just to start you off. There are a lot more awesome functions available in WordPress that are outside the scope of this guide.
In fact, one of the best things about using WordPress as a solution for your blog is its versatility. Don’t be afraid to experiment with customizing your own themes or finding lesser known but still awesome plugins to play with.
Do you have some favorites that didn’t make our list that every new blogger should know about? Maybe an awesome under the radar trick that could take your blog from zero to hero? Drop a comment below and let us know!